I really do love the movies. I do.
Ladies and gentlemen… Dean Cundey.
“It happens every year for Avid Media Composer users.”
Like clockwork.
December 6, 2024 - https://community.avid.com/forums/t/234365.aspx
December 15, 2024 - https://isaact.micro.blog/2024/12/03/is-mdv-still.html
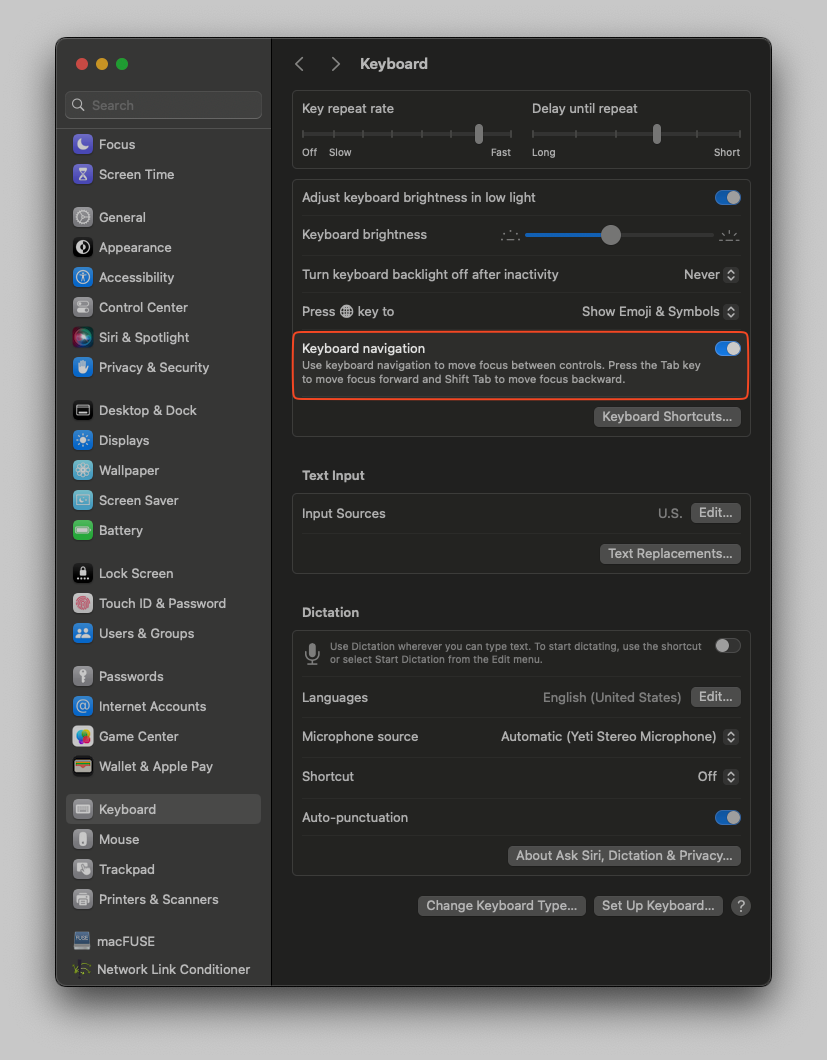
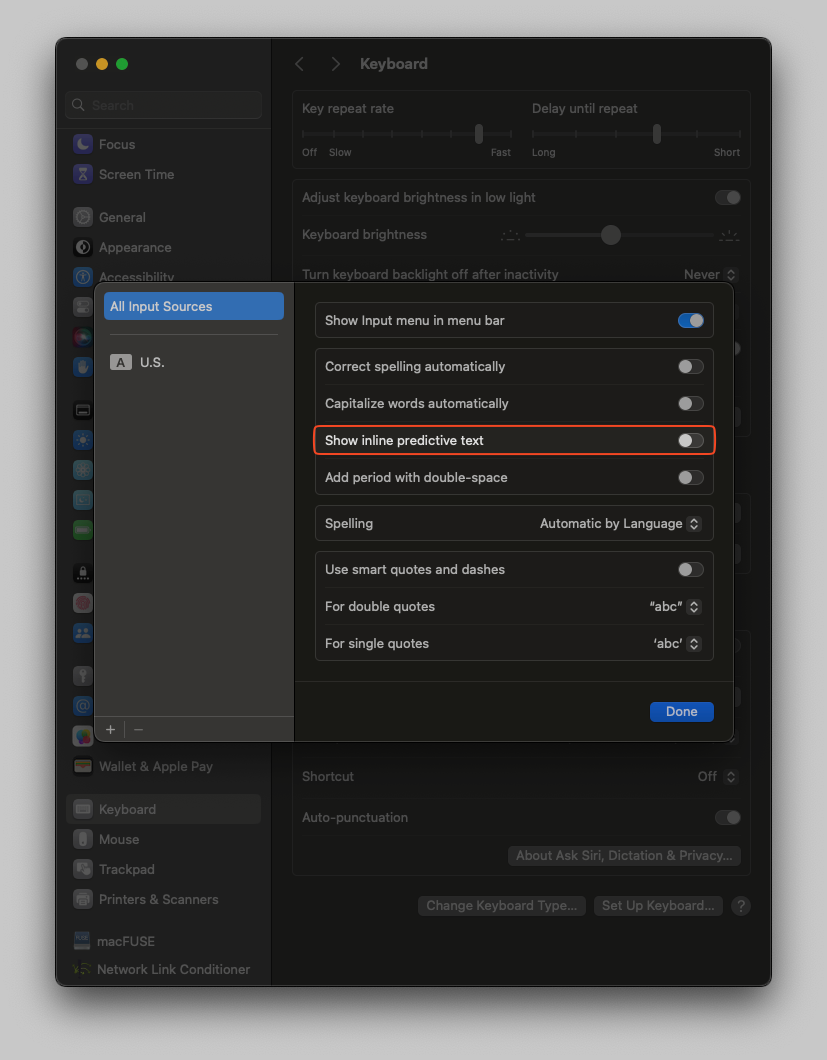
Two instant Quality of Life improvements in macOS:
Settings > Keyboard:
-
Keyboard navigation: ENABLED (Oldie-but-goodie)
-
Text Input > Input Sources > Edit… > Show inline predictive text: DISABLED
Became really noticeable (i.e. annoying) after an unknown Sonoma update.
I ❤️ DIGGING THE GREATS
Brandon Shaw’s Digging the Greats is an absolute gold mine for hip-hop heads. Brandon and his team have a real format, story arcs, and a cohesive-but-not-at-all-sterile presentation style. It feels like what MTV used to be.
Plus, although I’m a music nerd, I’m constantly learning stuff here.
Here’s a video on the 2005 Michel Gondry doc, Dave Chappelle’s Block Party:
I’ve know about this film for years. For Reasons, I haven’t seen it.
I don’t want to spoil it, but I want to make something right: Adam Blackstone.
I thought I knew my bassists, but wow… this is an egregious miss by me.
The reason? Check out this live, pitch perfect performance by Justin Timberlake on SNL:
Watch. That. Bassist.
Like the comments say:
I come back every now and then just to listen to the bass line; absolute divine.
One hundred percent.
Didn’t know his name. Thanks to DTG, now I know. (And knowing is half the battle.)
Thank you, Mr. Blackstone.
Wrong, righted (I hope).
The title of this next video reads like clickbait, but Brandon really is clarifying his stance: he’s not publishing these pieces for Patreon or YouTube, he’s producing for both.
This video also shows where the channel’s headed and how you can support it. Once I come back into some money, I intend to be a paid Patreon supporter (https://www.patreon.com/diggingthegreats), especially when you hear Brandon’s vision for what’s next. I think they’re gonna do it.
Finally, huge shout-out to Brandon for showing love to his illustrator / graphic designer / motion designer “Ace”. Whoever those mystery hands belong to, they have serious chops (hand. drawn. work. people; no AI Slop here) and absolutely nail the visual grammar of this subject. If I had actual turntables, those slipmats would be at the top of my list.
If you don’t know what Todd Vaziri from ILM is referencing here, please watch Hollywood’s Greatest Trick:
🆓 ▶️ https://www.fresnobee.com/news/nation-world/national/article134277069.html/video-embed
Scrub to 11:06 to learn about tax credits, their impact on visual effects workers, and the perceived impact on communities who offer them.
This is 28 minutes long.
Based on my own job-hunting experience, it’s well-researched and spot on.
Also see my latest job search results:
https://valiant-wrench-7be.notion.site/Isaac-T-s-Job-Search-14396e322e7280c29deed41bb3376350
Almost at 100 applications! 🥳
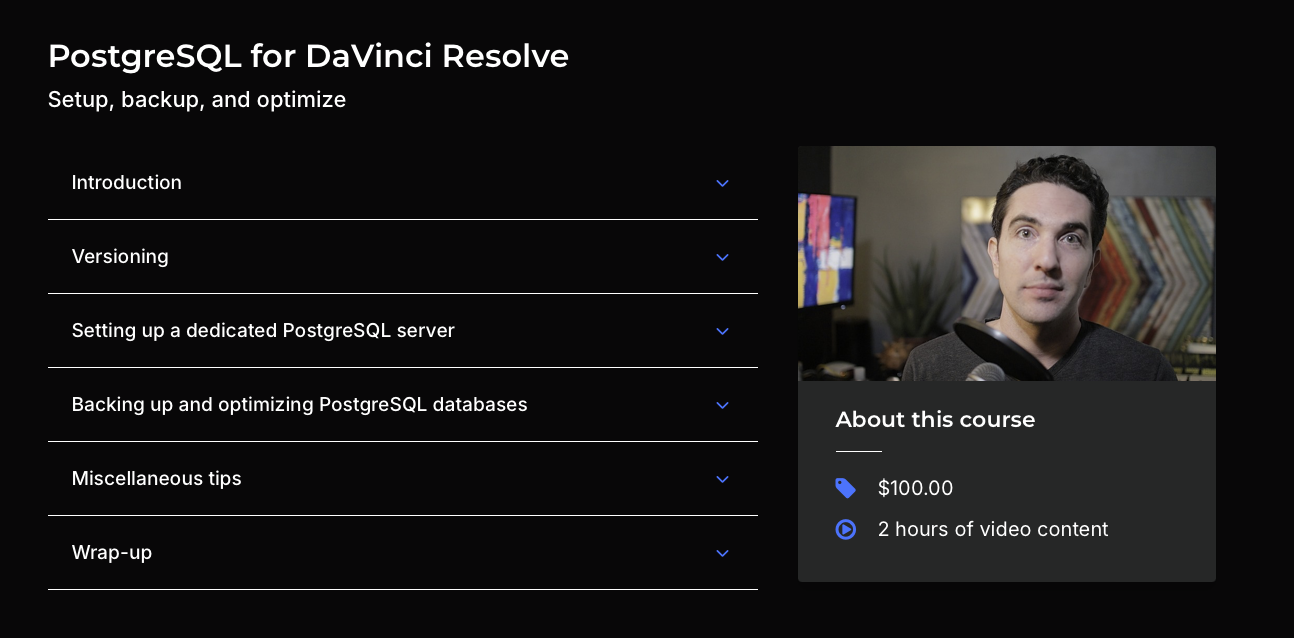
When the time comes, Seth Goldin’s The Definitive Guide to PostgreSQL for DaVinci Resolve is on my list.
https://definitive-guide-postgresql-davinci-resolve.thinkific.com
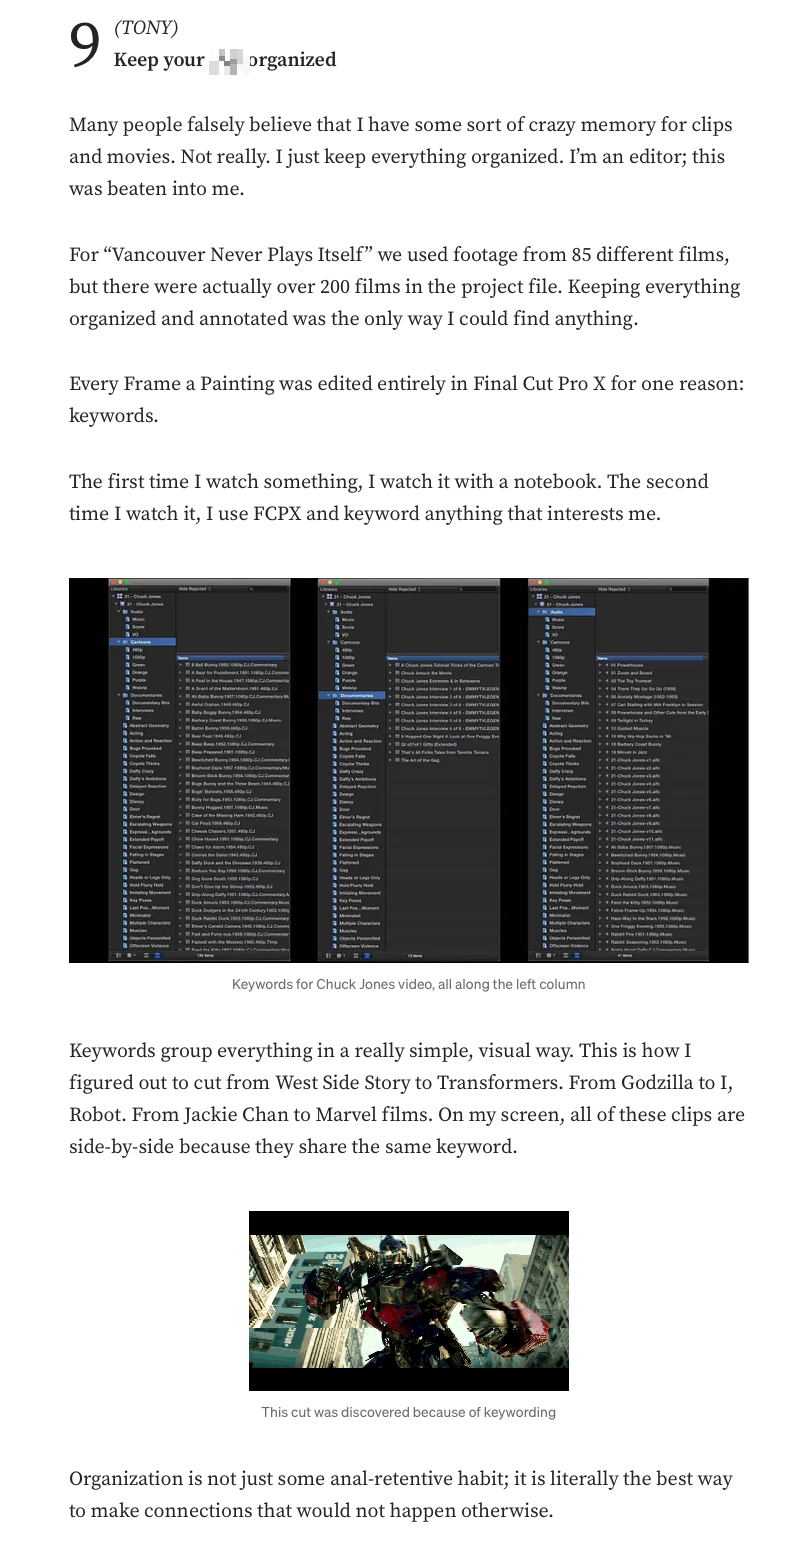
Tony Zhou and Taylor Ramos are back for a bit, but they published this script for what would’ve been their final episode of Every Frame a Painting back in 2017:
https://medium.com/@tonyszhou/postmortem-1b338537fabc (Just click the X; it’s free.)
I’ve read this before, but it definitely hits different now.
Three excerpts worth sharing:
- Tony and Taylor used Final Cut Pro and extensive keyword-ing led to delightfully surprising results in the edit. (I can attest to that as well.)
- You can’t cheat the triangle 👉🏽 https://fastgood.cheap/
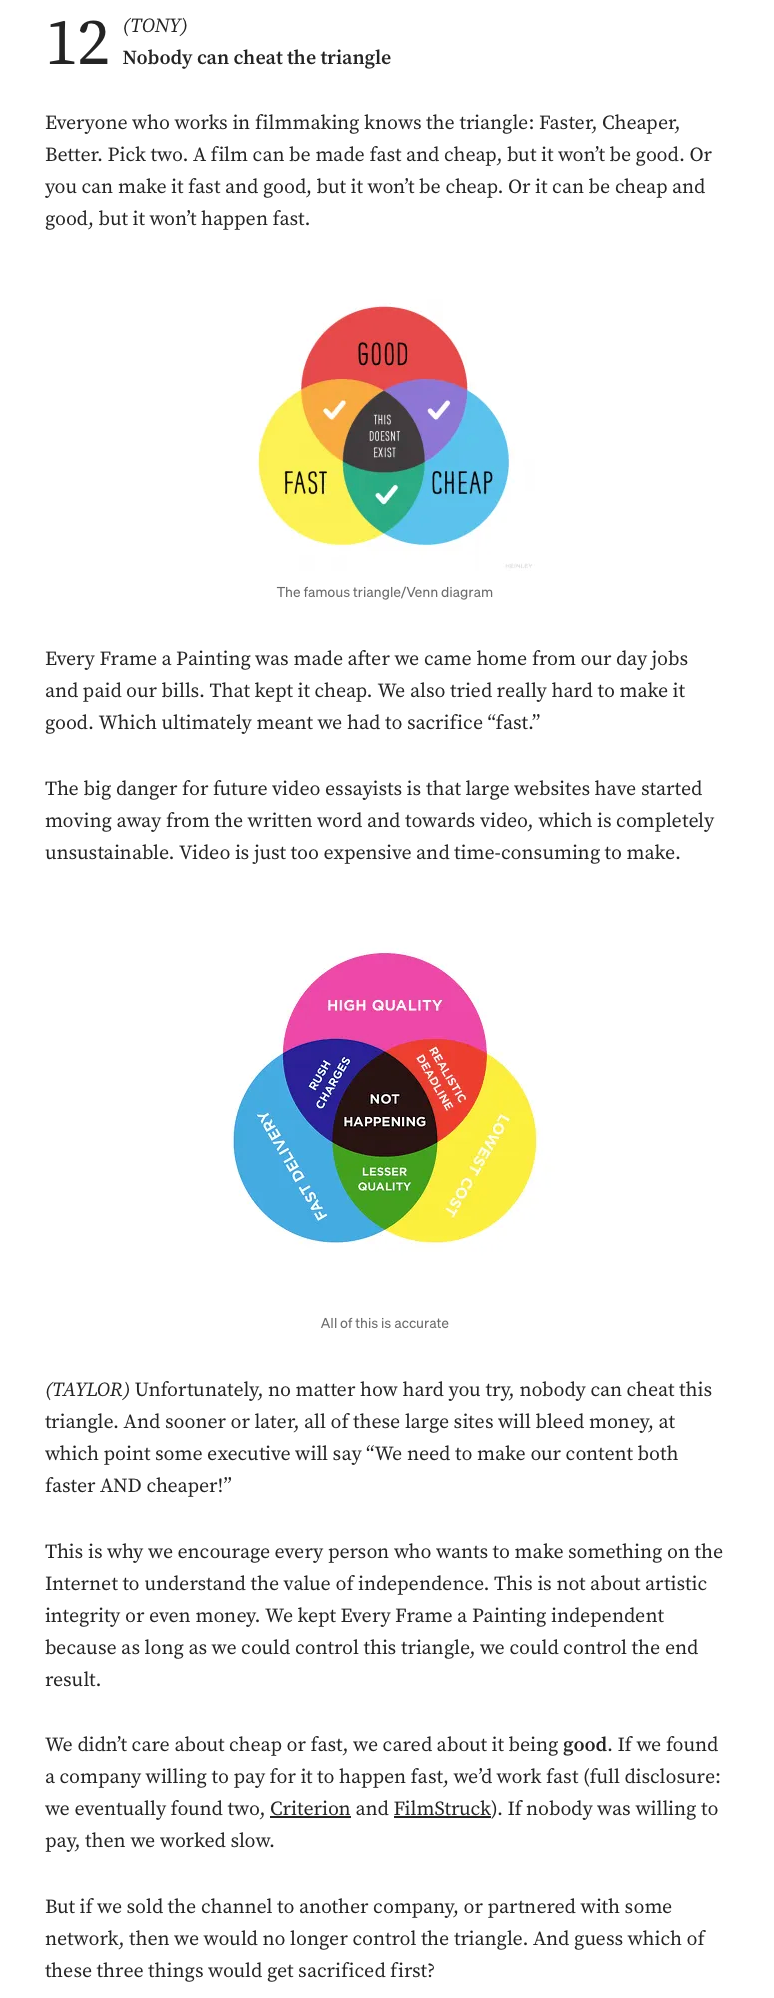
- Even the greats among us struggle with making and doing stuff. Learn when you’ve spent too much time doing something, then delegate it or let it go.

This post was made possible with contributions from viewers like you. Thank you!
CAN YOU COLLABORATE ON SHARED AVID PROJECTS STORED ON AN AVID NEXIS ALONG WITH THIRD-PARTY STORAGE?

Yes.
Starting in Mimiq Pro 24.2, you don’t have to choose between your NEXIS workspaces and other shared storage. You can use both.
SMB, AFP, or NFS. Quantum StorNext, Qumulo, QNAP, Synology, LucidLink Filespaces. You name it and you get Bin Locking and Bin Refresh on all the storage thanks to a Mimiq feature called NEXIS Coexistence.
Just make sure your NEXIS workspaces are mounted before launching Mimiq. If you need to control Mimiq’s Autostart behavior on an individual workstation, Mimiq has some lovely deployment options:
https://docs.hedge.video/mimiq/deployment-options
That also means you’re not choosing between having Mimiq or the NEXIS Client Manager installed on the same computer. Both Mimiq and the NEXIS Client Manager will be installed on the same computer. Mimiq will take the place as the active NEXIS client after it launches, and graciously relinquish the crown on quit (or exit).
Did this come in handy?
Check out my collection on Cotton Bureau! Buying a tee or hoodie from me supports future pieces like these. Thanks for your support!

GOOD CG IS INVISIBLE CG

Your favorite movie or TV show uses way more CG 1 than you realize.
For example, here are some visual effects breakdowns for Netflix’s Ripley (don’t worry, they’re short):
ℹ️ YouTube embeds removed to improve your chances of watching these videos.
https://www.youtube.com/watch?v=e19_j5BFV_w (VFX by ReDefine)
https://www.youtube.com/watch?v=ZoTzz1GBWeg (VFX by edi)
I live in New York and traveled to several of those regions in Italy last year. Those shots? Absolutely seamless… perfection. 👌🏽
“But Ripley’s based on a modern American classic. Those VFX should be seamless!”
OK, how about the VFX shots in a romantic comedy… from 2009?
Or how about the VFX in a television drama, like NBC’s This Is Us?
https://www.imdb.com/title/tt5555260/fullcredits (Do a Find for Series Visual Effects and start scroooolling.)
Do you remember those shows for their visual effects?
…
And that’s the point:

Show your love for the visual effects teams who tirelessly work to craft the shots, layers of shots, and elements that comprise the layers in those shots so we can sit back and get lost in a bit of movie magic.
About This Shirt
- The typeface is News Gothic and the color was derived from the 4K77 edition of Star Wars: Episode IV – A New Hope. My thanks to the Star Wars Comparison channel on YouTube for providing this meticulous comparison.
- I ran this design by Todd Vaziri at Industrial Light & Magic, and he didn’t hate it 😄. Actually, he was far kinder than that – thank you, Todd! Maybe we’ll see or hear about this in a future episode of Lighter Darker: The ILM Podcast.
I don’t like sounding dogmatic, but I also don’t want to sound apologetic for this next bit:
As movie fans, we should stop using the term “CGI”.
It’s fun to say and fun to use in conversation, but “CGI” stands for Computer-Generated Imagery. Originally, visual effects artists used this term to help decision makers and financiers see the need for adding computers to their toolbox. Now it implies that computers do all the work and humans have little or nothing to do with it.
Computers don’t make the moments we remember – people do.
And if you think this all smells of entitlement or privilege, you should really watch the four-part series “NO CGI” is really just INVISIBLE CGI featuring Visual Effects Supervisor Jonas Ussing. It’s astounding how far directors, producers, and actors will go to convince you, “Nope, no CGI in this movie,” because that narrative sells more tickets, rentals, and subscriptions.
Computer Graphics aren’t the problem, and purely practical visual effects don’t necessarily make for better, more effective, or less expensive shots.
Good CG is really invisible CG.

Now available at Cotton Bureau.
If you made it this far, use Coupon Code YTVUFFZR7F at checkout for a nice discount, or FREE99 for free shipping on all orders over $99 (USD) at Cotton Bureau.
Also, here’s a 16mm film scan of Episode IV’s opening crawl courtesy of the SG10 Film Archive channel on YouTube.
-
“CG” stands for Computer Graphics, which I’ll use as shorthand for any shots in a show produced using digital visual effects with any related disciplines. ↩︎
IS MDV STILL USABLE ON WINDOWS 10 OR 11?
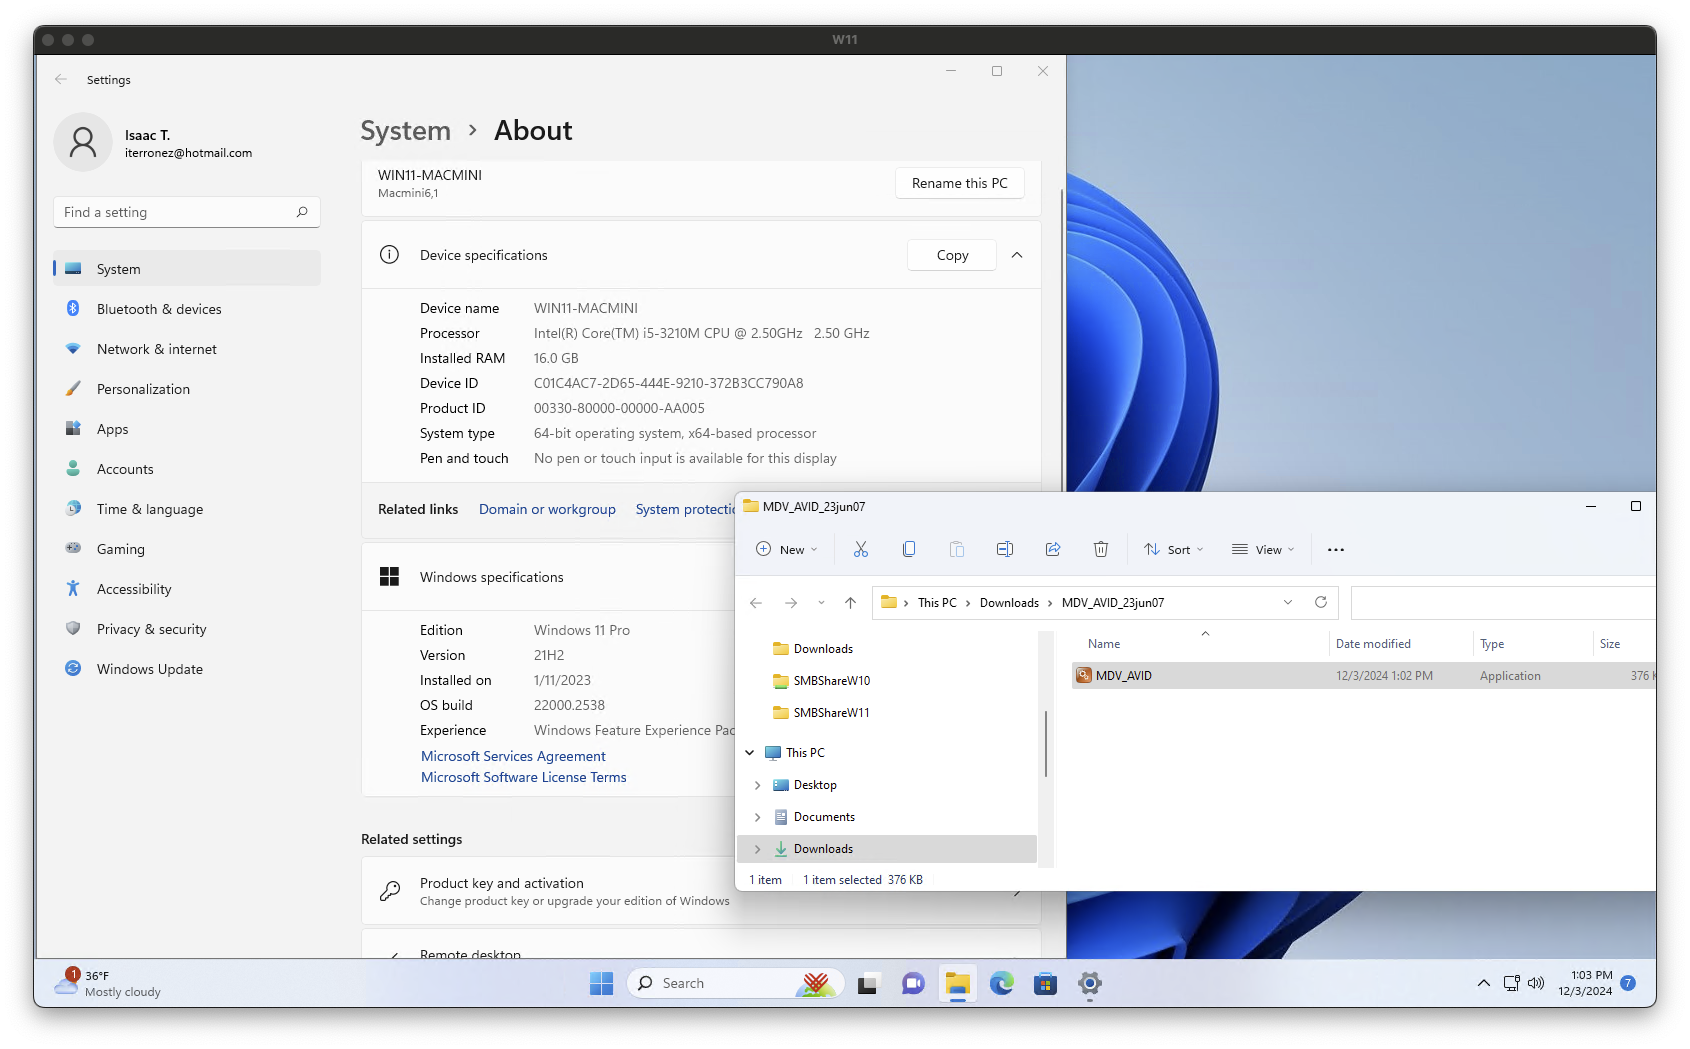
ℹ️ Microsoft ended support for Windows 10 on October 14, 2025.
It happens every year. Someone’s out of the office from December through January, but:
- They want to take an Avid Project and all associated media with them while they’re away.
- They want to hand off their Project and media to a teammate.
The question is:
What’s the best way to transfer my Avid Project and any specific media so we can keep working on it?
The answer is the incredible MDV.
Someone known as DJFio[DB] created MDV back in 2006. Originally, it was a Windows-only app, but since 2016 it became a macOS-exclusive renamed as MDVx.
The last Windows-only update? July 20, 2008.
So, is MDV still usable in modern versions of Windows?
Yes, MDV still works in Windows 10 and 11.
How MDV Works
This article isn’t an exhaustive tutorial of how to use MDV. For that, I’ll refer you to MDVx’s user manual – http://djfio.com/mdv/MDVx-theManual.pdf
The UI/UX differs a bit here and there, but regardless of the version, the core steps for using MDV are the same:
- MDV scans any attached volumes for Media Composer’s database files, the PMR and MDB files.
- MDV shows you a list of Avid Projects along with any associated media.
- You tell MDV what to do with that associated media with actions such as: Copy, Move, Sift, and Delete.
The Best Version of MDV for Windows
Here’s a list of all Downloads available from DJFio[DB]:
Scroll down to the bottom and look for the “MDV for Windows” items. (You can also do a Find in your web browser for “MDV for Windows”.)
As of this writing, they’ve listed four versions of MDV for Windows.
The best version? MDV for Windows v0.3 (jun-23-2007). Here’s why:
- The UI is complete and functional - unlike v0.4, everything works as expected.
- The
Siftfunction - MDV will create a new folder named after your Avid Project then Copy or Move your media files (MXF or OMF) into it. Super convenient and helpful. v0.4 has a stub for “Sift”, but it doesn’t work.
MDV for Windows v0.3 scans and operates on volumes:
- Mounted as Workspaces in Mimiq Pro for Windows.
- Local folders mounted as volumes using the
substcommand. (Number 16 of 21 on this list) - Shared network folders mounted as volumes using the
net usecommand.
But there’s one catch.
Media Stored on a Windows System Volume (C:\ )
MDV was written to search for those databases – the PMR and MDB files – at the root of a volume.
In Windows 10 and 11, where does Media Composer store media imported or generated to C:\ ? Here?
C:\Avid MediaFiles\
Nope.
Any media imported or generated on C:\ is stored here:
C:\Users\Public\Documents\Avid Media Composer
Copy/paste this path into File Explorer and you’ll find the ..\Avid MediaFiles\MXF folders or the ..\OMFI MediaFiles\ folders containing the PMR and MDB files along with any media files.
Since this path is not the root of C:\ , MDV will ignore it when you click Search for Avid databases.
If you know some media may be stored on C:\ , how can you nudge MDV to Search… and Scan! this folder?
Use the subst command to mount that path as a new volume in File Explorer:
subst Q: "C:\Users\Public\Documents\Avid Media Composer"
In this example, you’re telling Windows to create a new volume called Q:\ in Finder Explorer mapped to that magic path. Go back to MDV, click Search…, then Scan!, and if the PMR and MDB files are there with associated media, MDV can now see them.
One Last Gotcha – Securitay!
The first time you try launching MDV for Windows v0.3, Windows will warn you with this: 1
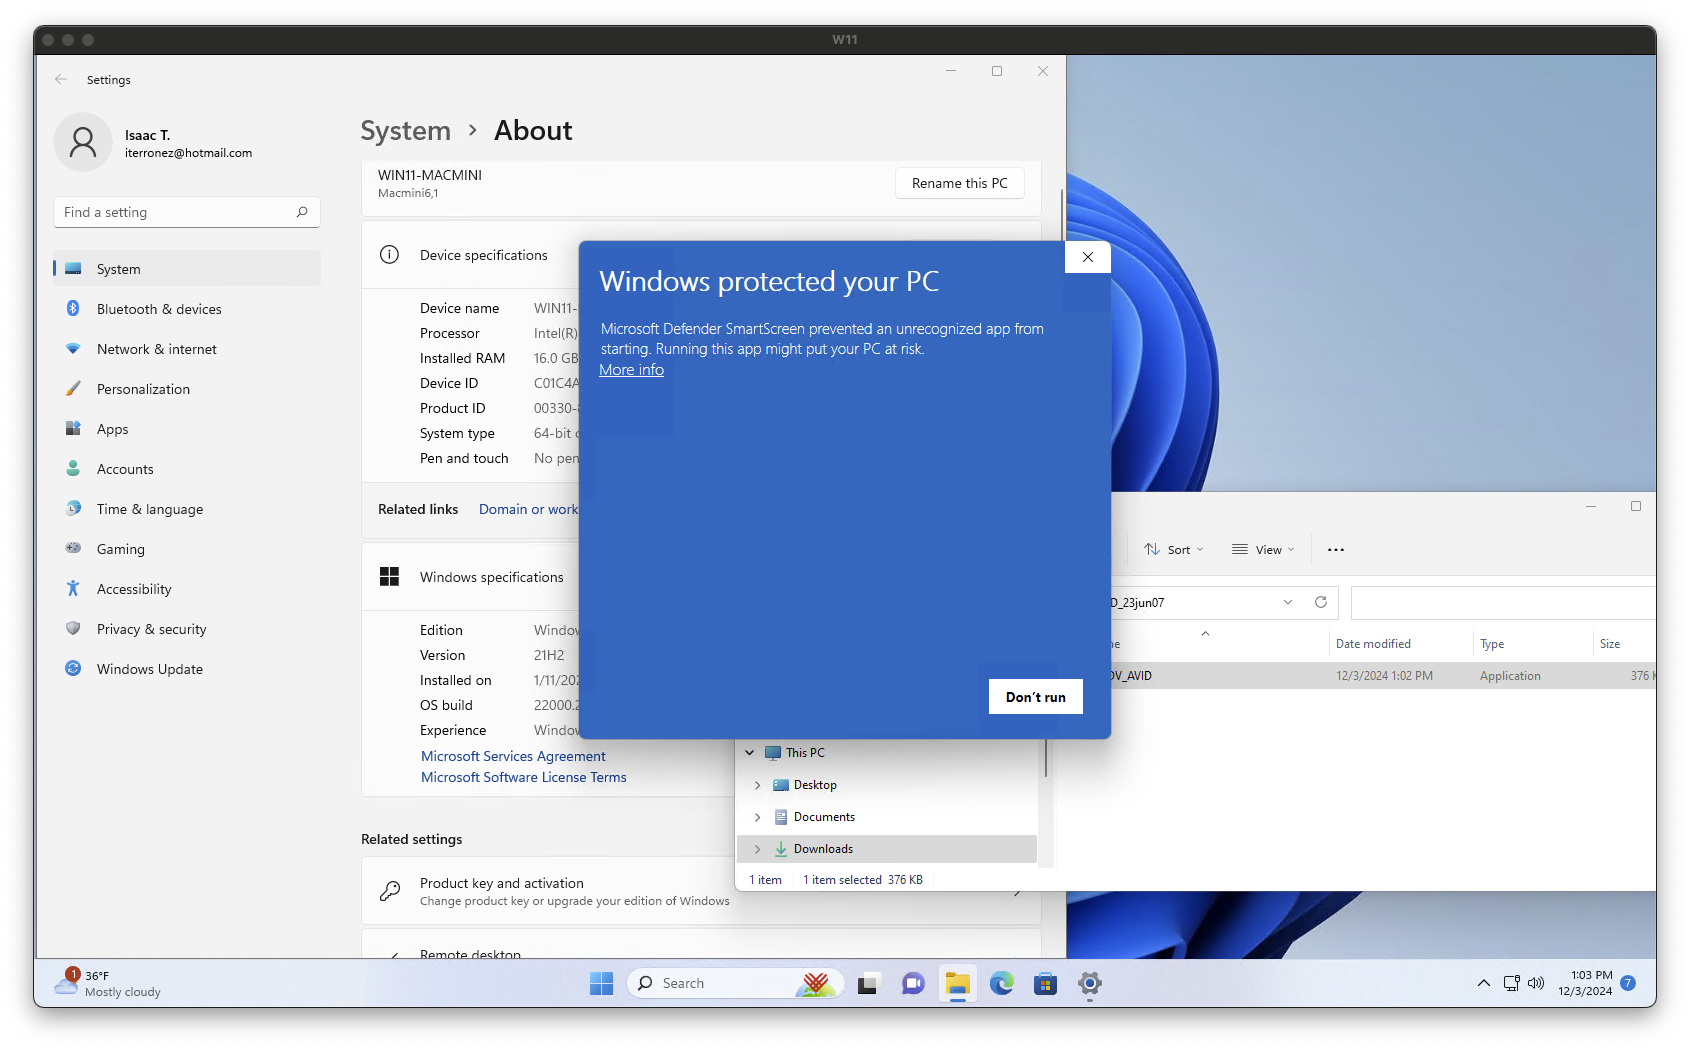
If you have the permissions to do so, take these steps:
- Click “More Info”.
- When you see the App identified as MDV_AVID.exe, click
Run anywayand MDV for Windows v0.3 will launch successfully.
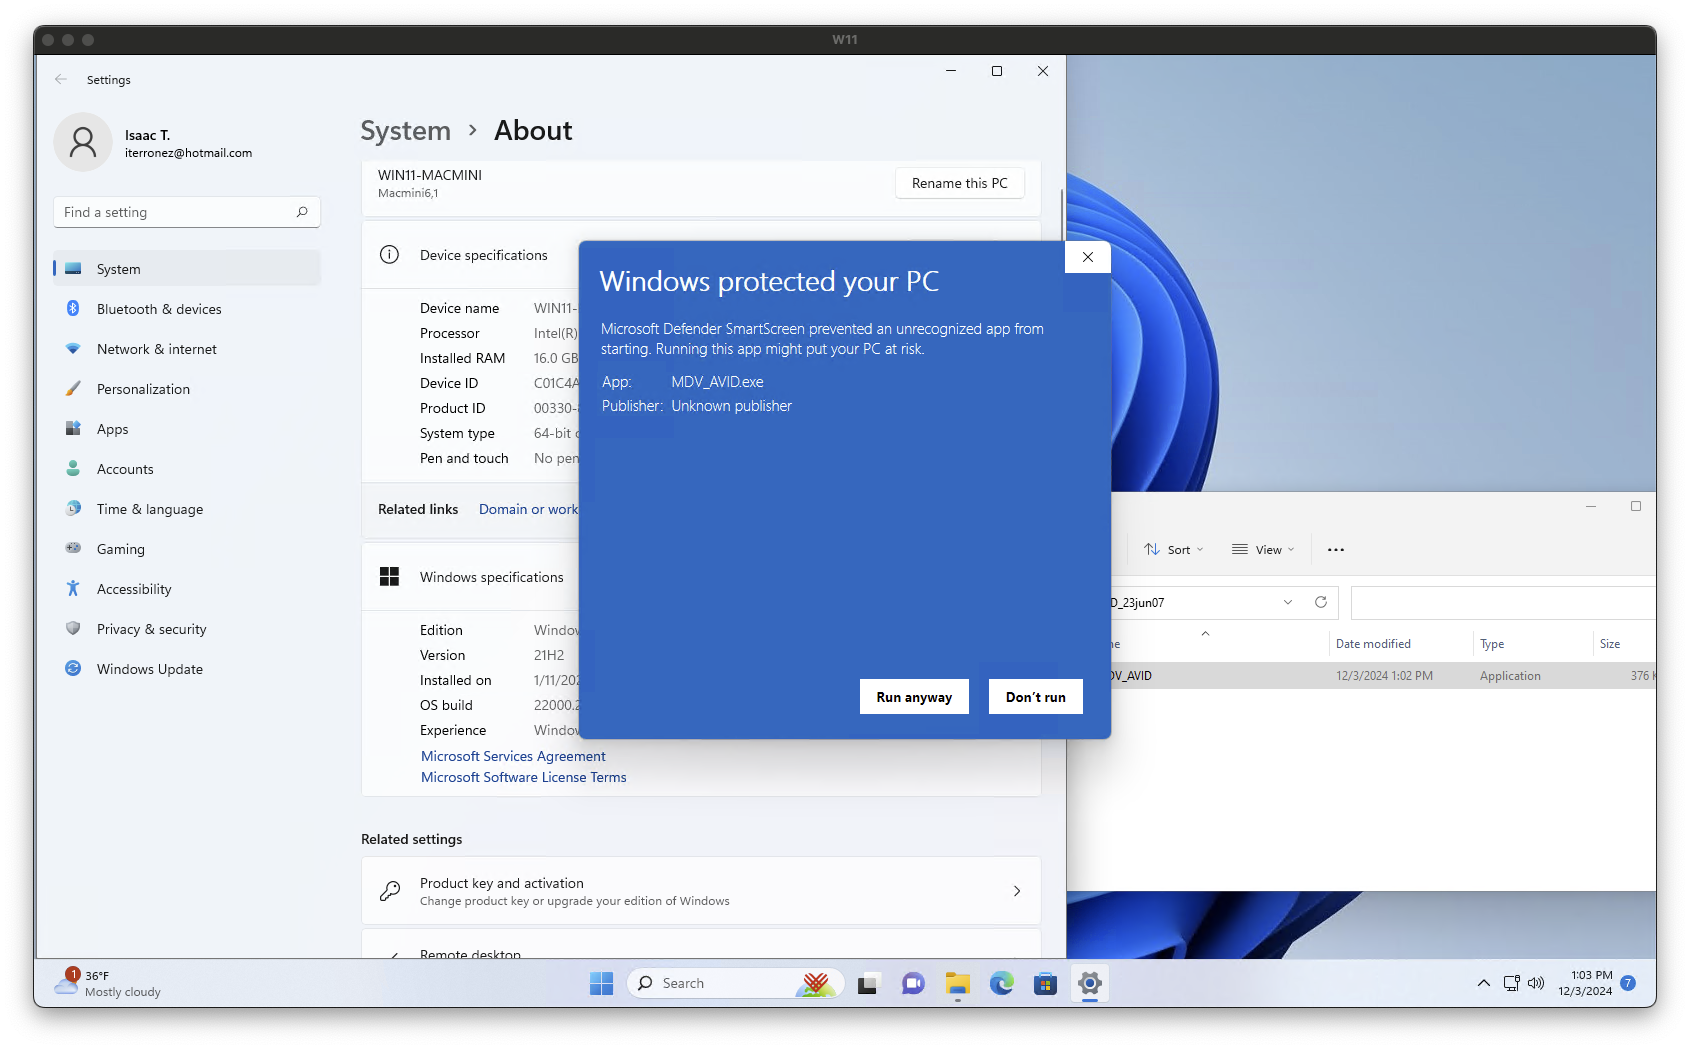
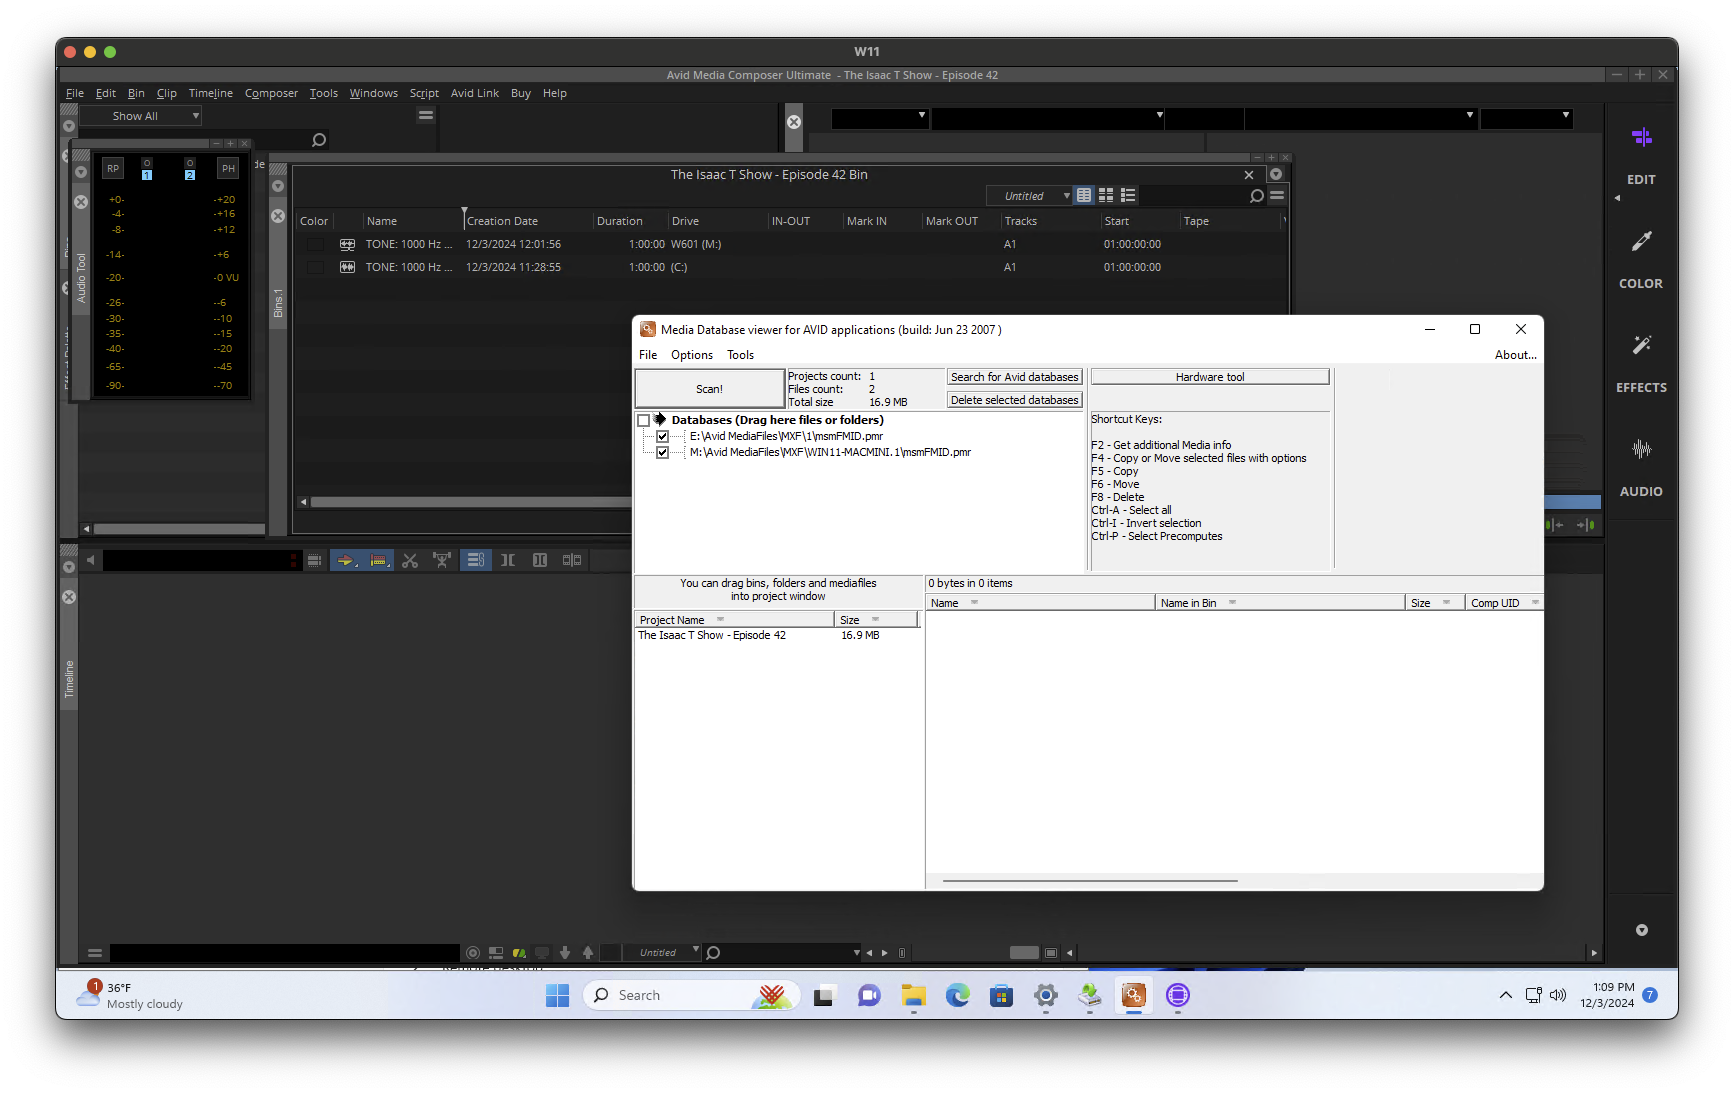
If MDV won’t launch, you may have to launch it using Run as Administrator or contact your local IT support for assistance.
If you’re a long-time MDV fan and you’ve missed using it in Windows, it’s still great and it still works in post-Windows 7 environments.
Now, go transfer your Avid Projects and media to a super-fast external drive and enjoy working in your cabin in the woods.
Was this helpful?
Rather see something like this as a video?
Check out my collection on Cotton Bureau! Buying a tee or hoodie from me supports future pieces like these. Thanks for your support!

-
You’ll see this warning in Windows 10 and 11. ↩︎
RETROACTIVE - DISCONTINUED, BUT SUPPORTED ALL THE WAY UP TO MACOS SONOMA

Tyshawn Cormier wrote something remarkable in Retroactive. You can use it to bring some of Apple’s legacy apps back to life on more recent versions of macOS (née OS X).
Final Cut Pro 7 and Aperture users were the real winners here. But with macOS Sequoia’s release, Tyshawn officially retired Retroactive.
Retroactive’s focus is now on helping legacy app users migrate from their old environments to a newer, supported version.
Perhaps Bong Joon-ho will cut his next feature in Final Cut Pro 11. 😄
GitHub > Tyshawn Cormier > Retroactive
Final Cut Pro fan? Know a Final Cut Pro fan? Check out my Cotton Bureau store and support future pieces like these. ✌🏽
🛒 https://cottonbureau.com/people/isaac-t

INTRODUCING... ISAAC T. X COTTON BUREAU
What started as a weekend comment turned into this:
I’m teaming up with Cotton Bureau to create my own line of merchandise as part of their curated collection.
Why?
I want to celebrate the unsung heroes among us who make our favorite movies and TV shows.
Right now I’m making the shirts I would’ve worn on set, in studio, and out in these streets.
Like what? Here’s a preview:
Ultramagnetic 🛒

Time to Make the Dailies 🛒

Assistant Workflow Editor 🛒

All printed on high-grade cotton with a thoughtful selection of sizes, styles, and colors. And so far, every shirt’s available in isaact.co’s signature blue.
When are they available?
Right now… on Cotton Bureau 😎
https://cottonbureau.com/people/isaac-t
Orders typically ship within 2-5 days.
So #PostChat? #PostSky? People who make movies and TV? People who watch movies and TV? Spread the word: I’m making fresh merch just for you.
Did you get this far? Use coupon code YTVUFFZR7F at Checkout for a discount.
Welp. www.npr.org/2024/11/2…

I GUESS YOU'D BETTER COME IN

Hello. Like many of you, I lost my job this year.
I live in New York State, over an hour north of New York City. I pay $3100 per month in rent.
I receive $504 per week from New York State in unemployment benefits.
As you can see, the math ain’t mathin’.
Like Robert Townsend’s tale of making Hollywood Shuffle on a credit card, I bet on myself. I’ve risked it all. But after December 2024, I will not be able to pay for rent or the basics of life.
Get a job!
I live in New York State, over an hour north of New York City.
NYC is loaded with opportunities, right?
Nope. Not unless you know someone or you’re willing to spend all of your money commuting to NYC for a low-wage role.
Also here’s an ugly truth: most positions you’ve applied for – particularly those with “Senior” in the title – were never meant for you. They’re intended for an existing team member who’s already paid their dues in that company.
Where have you applied?
I’m glad you asked!
What started as a simple To-Do list in Notion became difficult to update and increasingly meaningless because I’ve applied for so many roles.
Since I have to meet with a new contact at New York State’s Department of Labor on December 4, I decided to refactor that To-Do list into a Database.
Here it is – Isaac T.’s Job Search:
https://valiant-wrench-7be.notion.site/Isaac-T-s-Job-Search-14396e322e7280c29deed41bb3376350
This is published in Read Only mode, but feel free to tinker and explore as you please. For example, I sorted the Complete List view by Date Applied > Ascending, but you can change that. You’ll probably find the Days Until Outcome Reached column and the Board view the most interesting.
Depending on your local web browser and computer, you may need to click Load more once you reach the end of the list.
I’ll continually update this doc until I find my next role, so feel free to follow along at home.
You’ve applied for so many roles – don’t you know what you wanna be when you grow up?
I’ve had a few well-meaning people look at my job submissions and conclude I lack focus or vision.
Nope.
All my professional life I’ve worked in small-but-mighty teams. In those environments, you have to get comfortable wearing multiple hats and context switching. This job search revealed just how many hats I’ve worn, and how many of those hats contained even more hats.
So what do you want to do?
I’m re-dubbing myself a Creative Technologist, which seems to combine or intersect somewhere between a:
- Sales Engineer (perhaps Pre- or Post-Sales)
- Solutions Architect (the no-code variety)
- Technical Writer
Simply put:
I want to keep helping teams work together from anywhere, in better and faster ways, using their favorite technologies.
What have you been doing in the meantime?
Working in and around Avid Technology’s ecosystem for decades now (really really), I decided to niche down on helping Avid-based teams demystify or simplify their workflows.
I’ve written articles aimed at boots-on-the-ground folks in Media & Entertainment – Digital Imaging Technicians (DITs), Lab Technicians, and Assistant Editors – but I can confirm they’ve impacted others in unexpected ways.
Those articles may not look like much, but they represent days – sometimes weeks – of research and testing to write and publish something useful that doesn’t add noise to the Avid community.
Of course, I’m also trying to keep my finger on the pulse of other workflows and environments such as Apple’s Pro Apps (Final Cut Pro, Motion, Compressor), Adobe Creative Cloud (Premiere Pro, After Effects), and Blackmagic Design’s DaVinci Resolve.
My mind keeps coming back to this scene from Ron Howard’s Cinderella Man:
https://youtu.be/e4fb7N_ICj0?si=K3OXYIJkEGtXn3jj&t=16
I have a feeling a lot of us live this way now, but don’t want to talk about it.

Well, starting this week, the business world enters the holiday season. That means I’ll keep applying for new roles, but I don’t expect to hear back about any of them until January 2025.
Maybe that’s not you.
Maybe you’ve been following my work and you like the cut of my jib.
Or maybe your department needs to spend that remaining budget on someone like me by December 31.
If so, let me make this plain:
I need a job. On January 1, 2025, I’m all out of quarters.
Do you need me? Know someone who needs me? Would you be willing to vouch for me in a specific role?
Feel free to email me – hey@isaact.co – or schedule a chat on my Calendly to talk about some possibilities: http://calendly.com/isaactdotco/30min
👋🏽
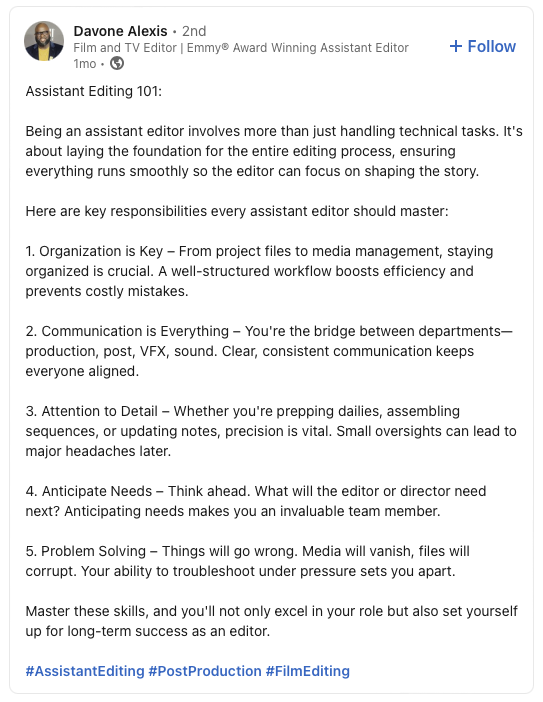
Which is why “Assistant Editors” should really be called “Workflow Editors”.
Nevertheless, excellent list from Davone Alexis (LinkedIn) 👇🏽
In those early days of playing with Adobe Dimensions, then working in MetaCreation’s Infini-D, then Eovia’s Carrara, I never thought shots like these would be possible, let alone seeing my son make them.
Here’s a tighter version of that demo reel, created with the generous help of Ryan Summers at SPILLT:
Joseph’s #OpenToWork! (LinkedIn)
More work available on:
It has never been a better time to be a Final Cut Pro / Motion / Compressor / Logic Pro user.
Look for these tidbits in Chris Hocking’s coverage of the FCP Creative Summit – Day 2:
- Chris' Apple Vision Pro reveal
- How the Magnetic Mask stores data in a Library
- Highlights from Michael Cioni’s Strada presentation
- The overwhelming stats from Apple’s Fitness+ production and post-production team and how Final Cut Pro is at the center of it all
CREATING DAILIES (OR RUSHES) OUTSIDE OF AVID MEDIA COMPOSER
Of all the items I’ve written about here, demystifying and simplifying the Avid Media Composer dailies process for DITs, Lab Technicians, and Assistant Editors seems to resonate the most. Here’s a step-by-step guide for doing so based on select pieces published here on my blog:
Creating Dailies (or Rushes) Outside of Avid Media Composer (PDF)
While I have your attention:
Today is November 12, 2024. I’ve had my #OpenToWork badge enabled on LinkedIn since May 2024. I’m about 45 days away from being unable to pay for anything – rent, food, utilities, etc.
If you’re a company who’s been observing me and you have a position in mind, please reach out. The larger your organization, the longer it will take to bring me on board.
If I’ve already applied to multiple positions at your company, it’s not that I lack focus or vision. The thing is: I’ve always worked for small companies and startups and, thus, always worn more than one hat. What I’m continually discovering is, depending on the size of the company, one of the hats I wore contains even more hats worn by only one person. Applying to multiple positions means I feel good either being an immediate contribution in that role or I can quickly learn what’s needed to be a valuable contributor in a reasonable amount of time.
I would love to continue helping creative teams work faster together from anywhere using their favorite apps and platforms. But I’m at the point where the family and I will have to take on part-time work in retail or shipping just to make ends meet. And for someone with my time, skillset, and experience, having four people deliver pizzas, work at the Home Depot, or drive an Amazon truck for $25 an hour makes no economic sense to me.
I know, “Movies don’t owe anybody a living,” but people still use technology, and the rift between those who make it and those who use it gets further and further away. I can help you bring those two groups together.
Reposts to boost this are welcome. If you have a lead or a position in mind, you’re welcome to email me: hey@isaact.co
Or if you want to schedule a chat, here’s my Calendly: https://calendly.com/isaactdotco/30min
Thanks for reading and thanks for your support.
What’s being made in Final Cut Pro these days?
A lot.
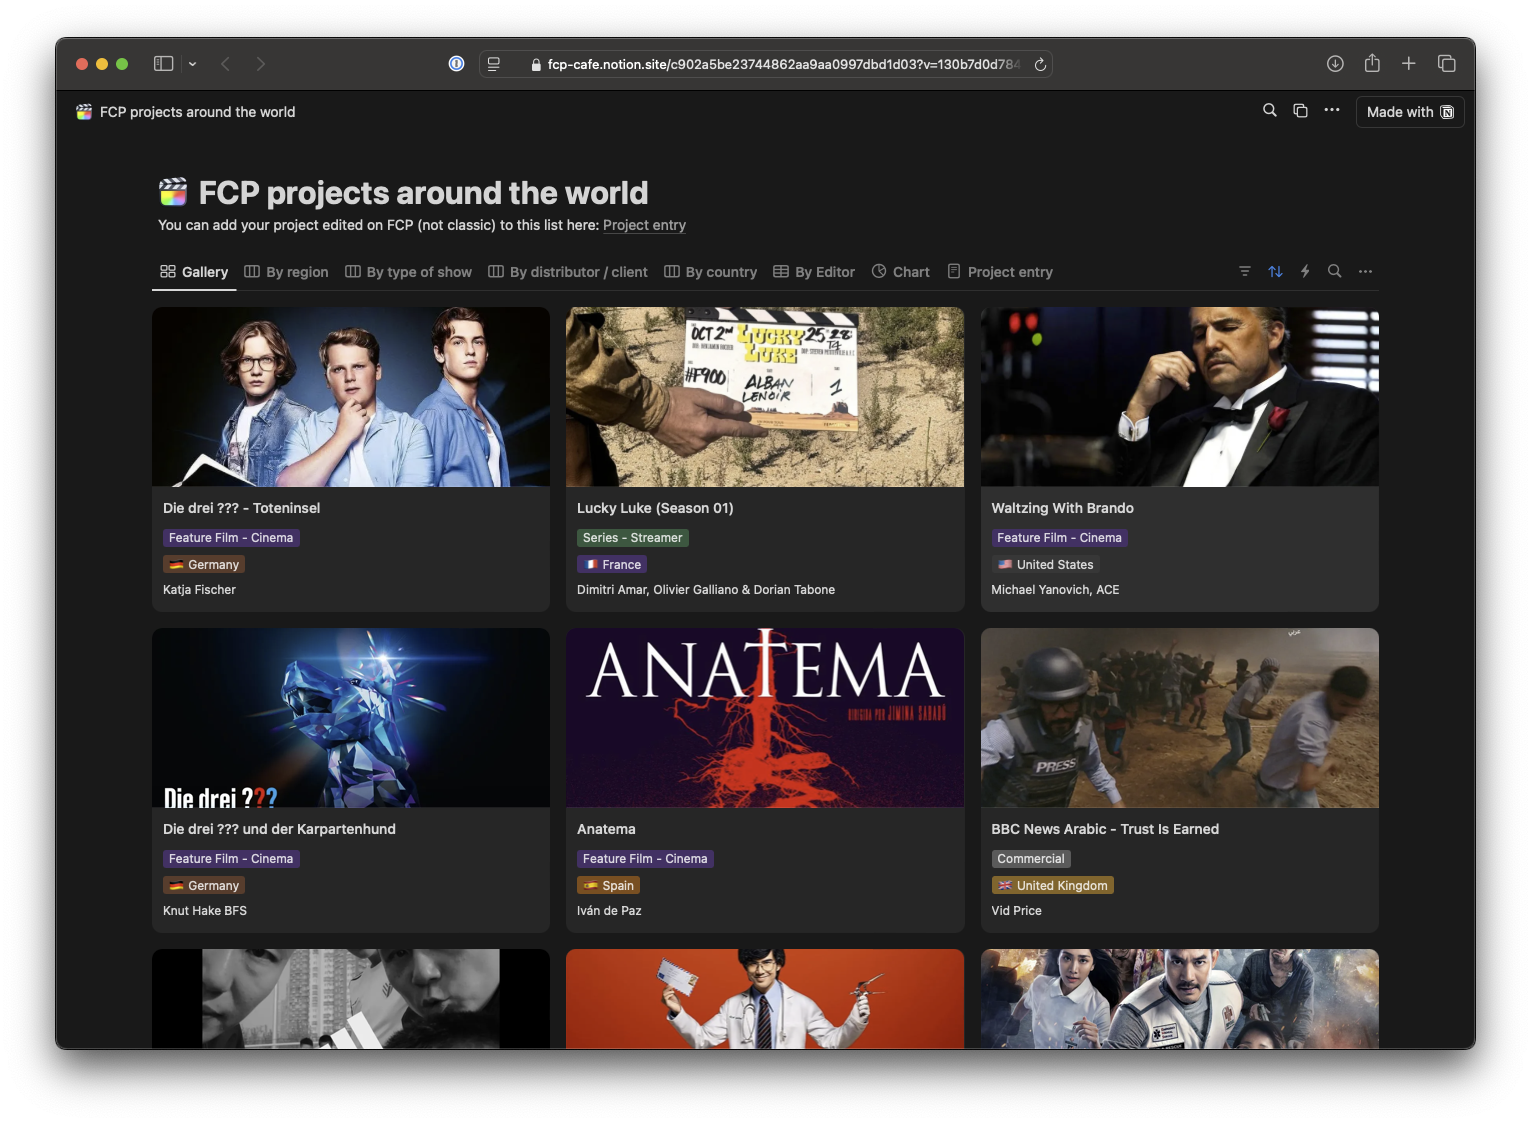
A big thanks to Knut Hake and Sam Plümacher for coordinating and publishing this massive list – FCP projects around the world:
[fcp-cafe.notion.site/c902a5be2…
Don’t see your work on the list? Add it here!
https://knuthake.notion.site/693bfd0561ee4681bad49c05dd9a6629
Missing the Final Cut Pro Creative Summit in person? Follow along at FCP Cafe (https://fcp.cafe).
RAV-BOT’S AVID BIN GENERATOR BY DALBYTECH
As soon as you hit the set, the clock’s ticking. Anything you can do to save time, even if it’s a fraction of a second?

Done.
Well, if you’re a Digital Imaging Technician (DIT), Lab Technician, or Assistant Editor, and you know you’ll be working in Avid Media Composer, here’s another timesaver:
Yes, you can transcode dailies (or rushes) outside of Media Composer in several different apps, but now you can create Bins outside of Media Composer too thanks to RAV-bot’s Avid Bin Generator.
Just head here:
https://ravbot.dalby.tech/Generate Named Avid Bins
And follow the delightfully simple steps to generate a batch of Bins with a custom naming scheme.
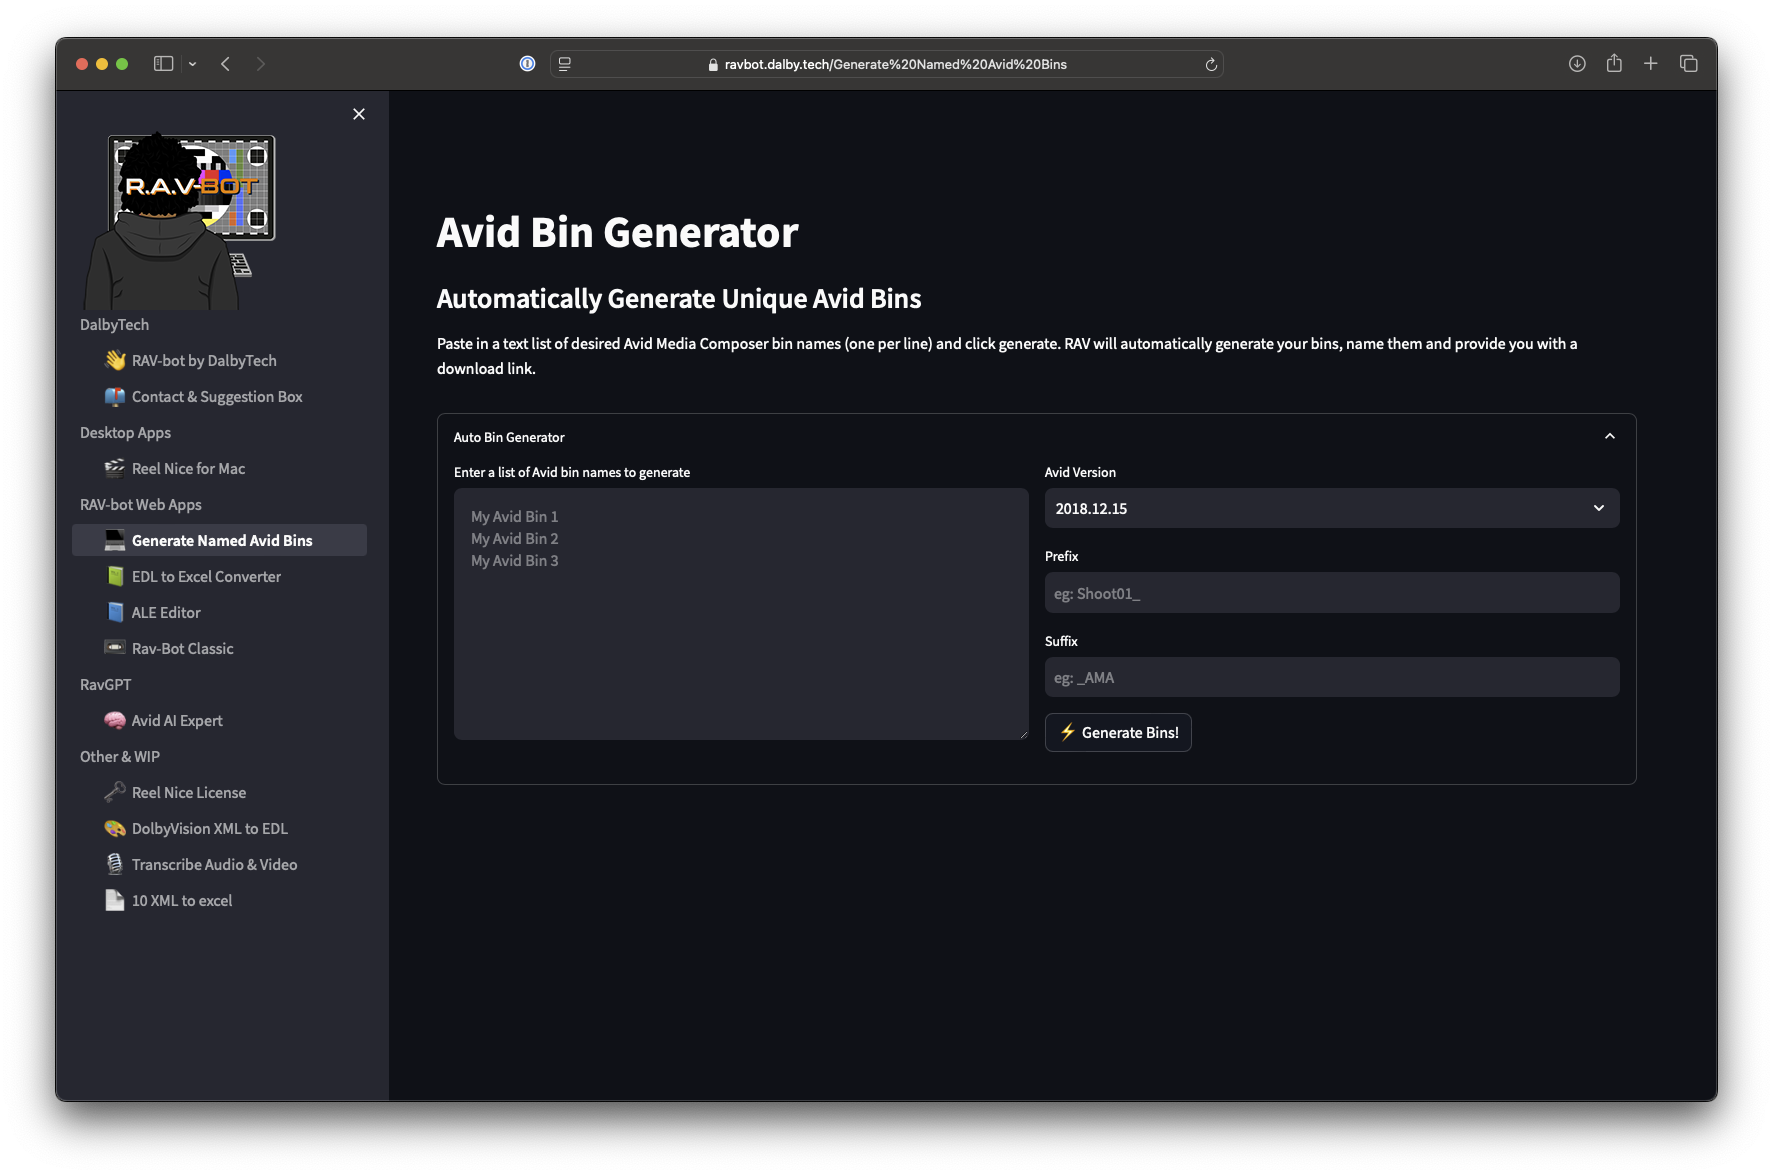
Not only is the Avid Bin Generator available from anywhere at no charge, James did the legwork so Editorial teams can generate Bins for a curated range of Media Composer versions:
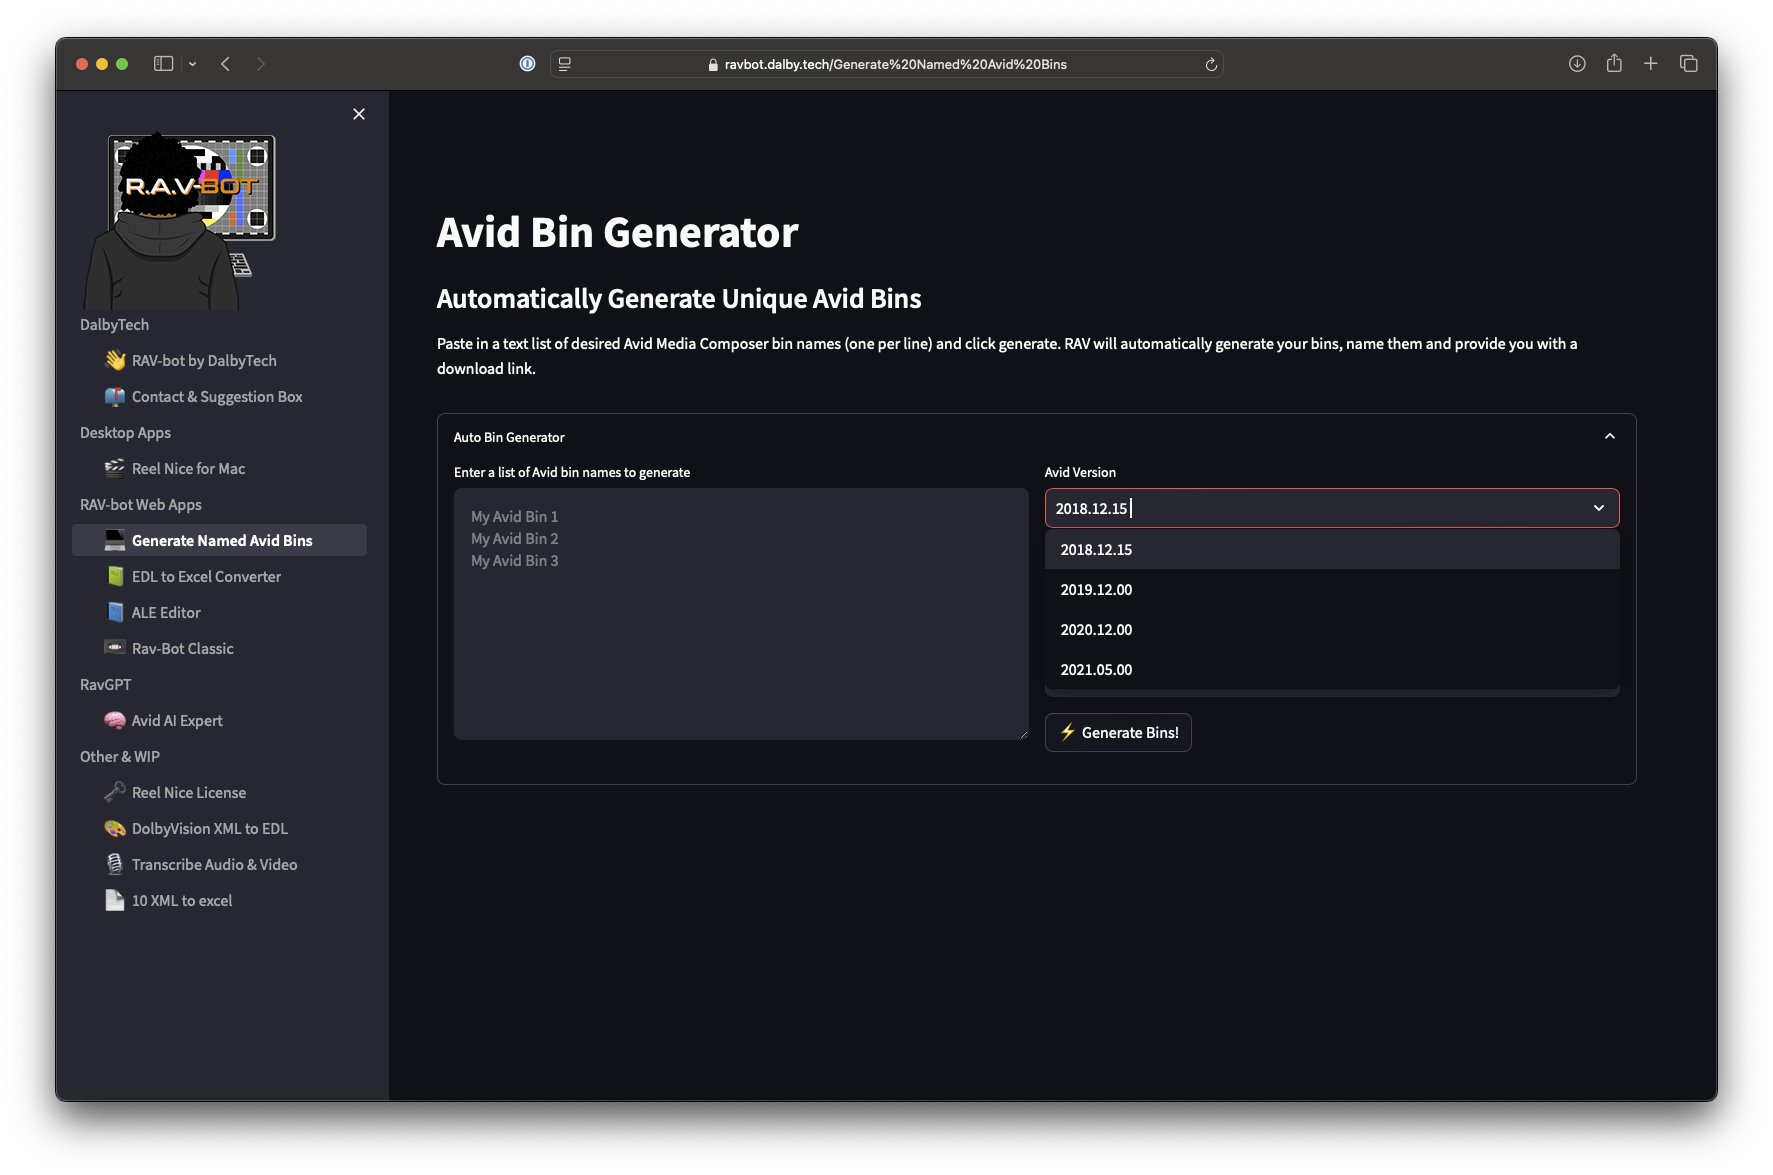
And I can confirm: these Bins work. 👌🏽
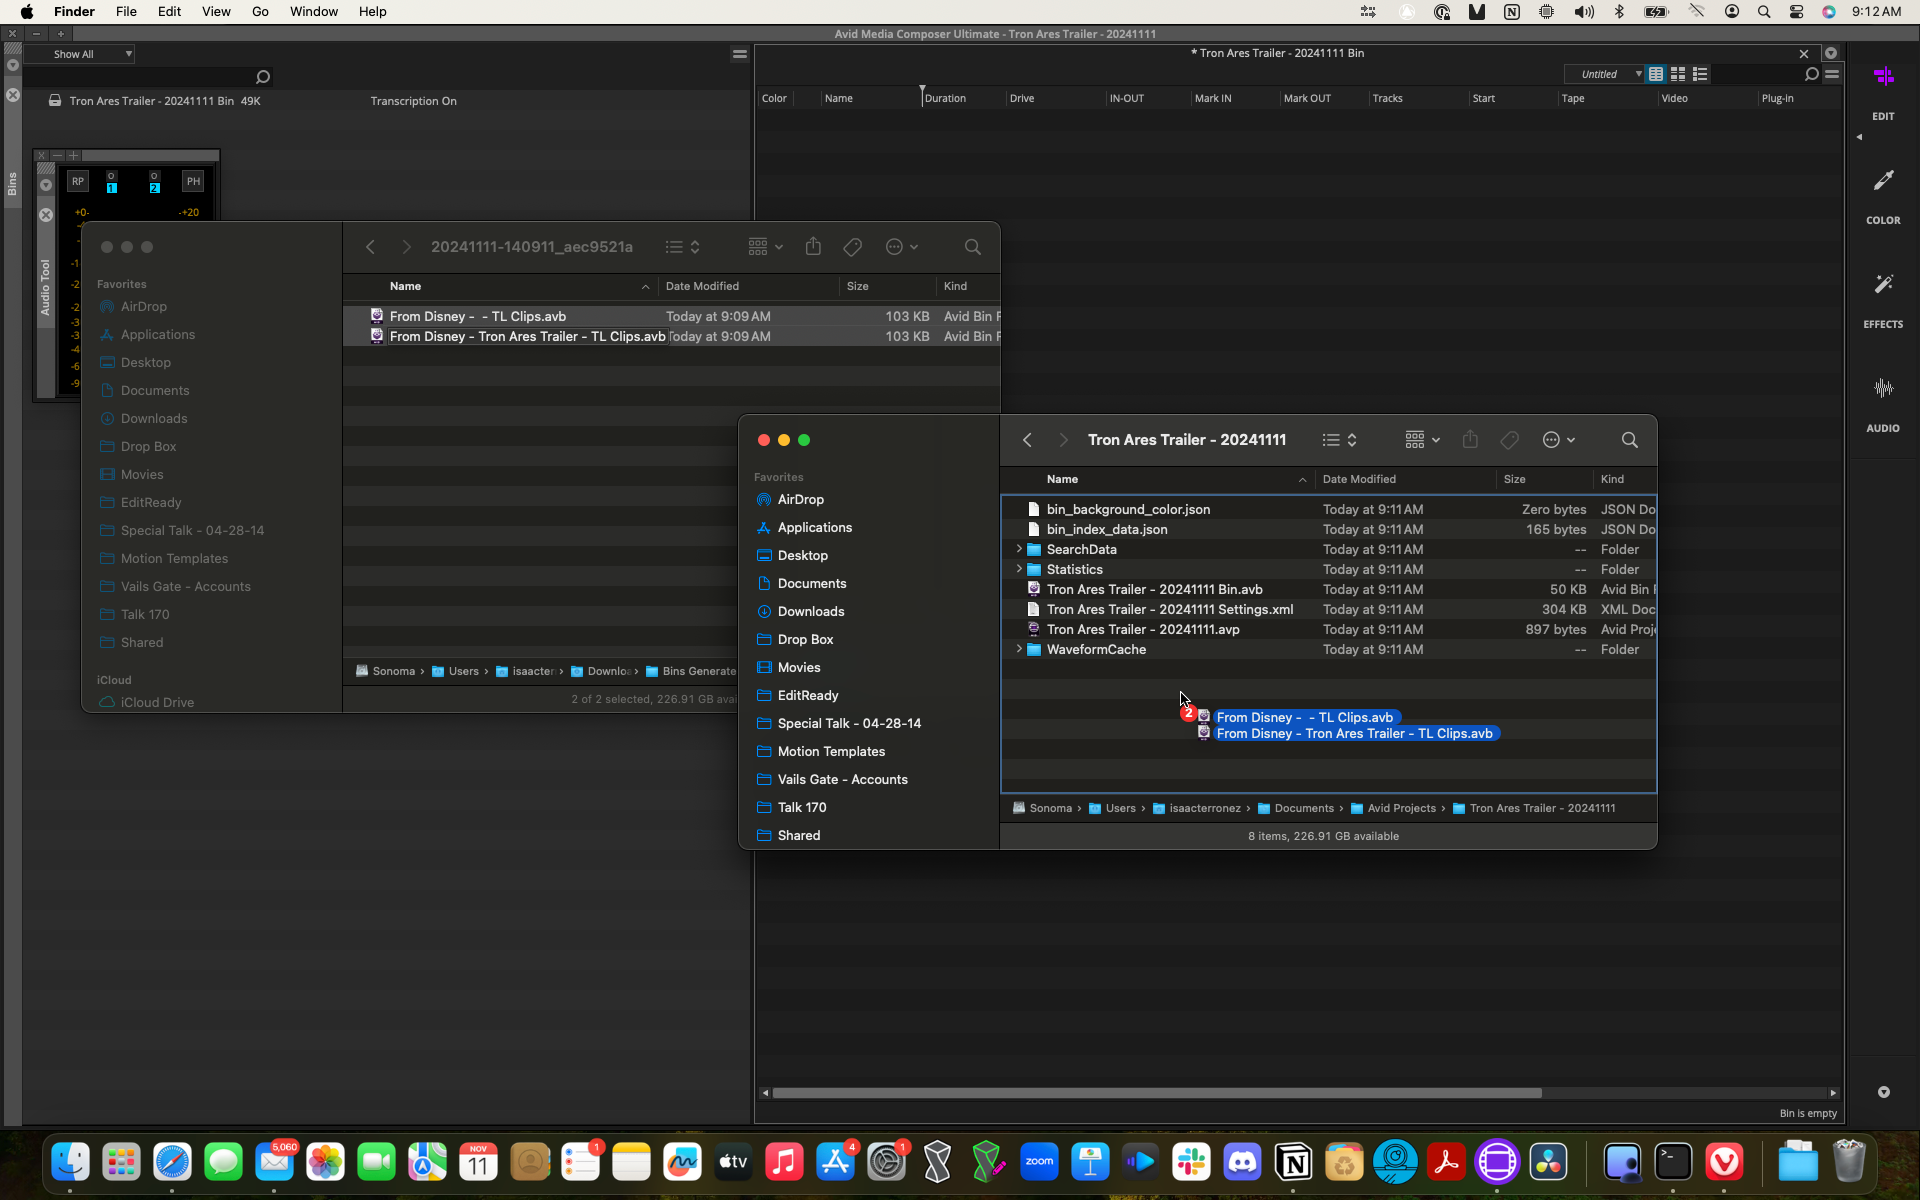
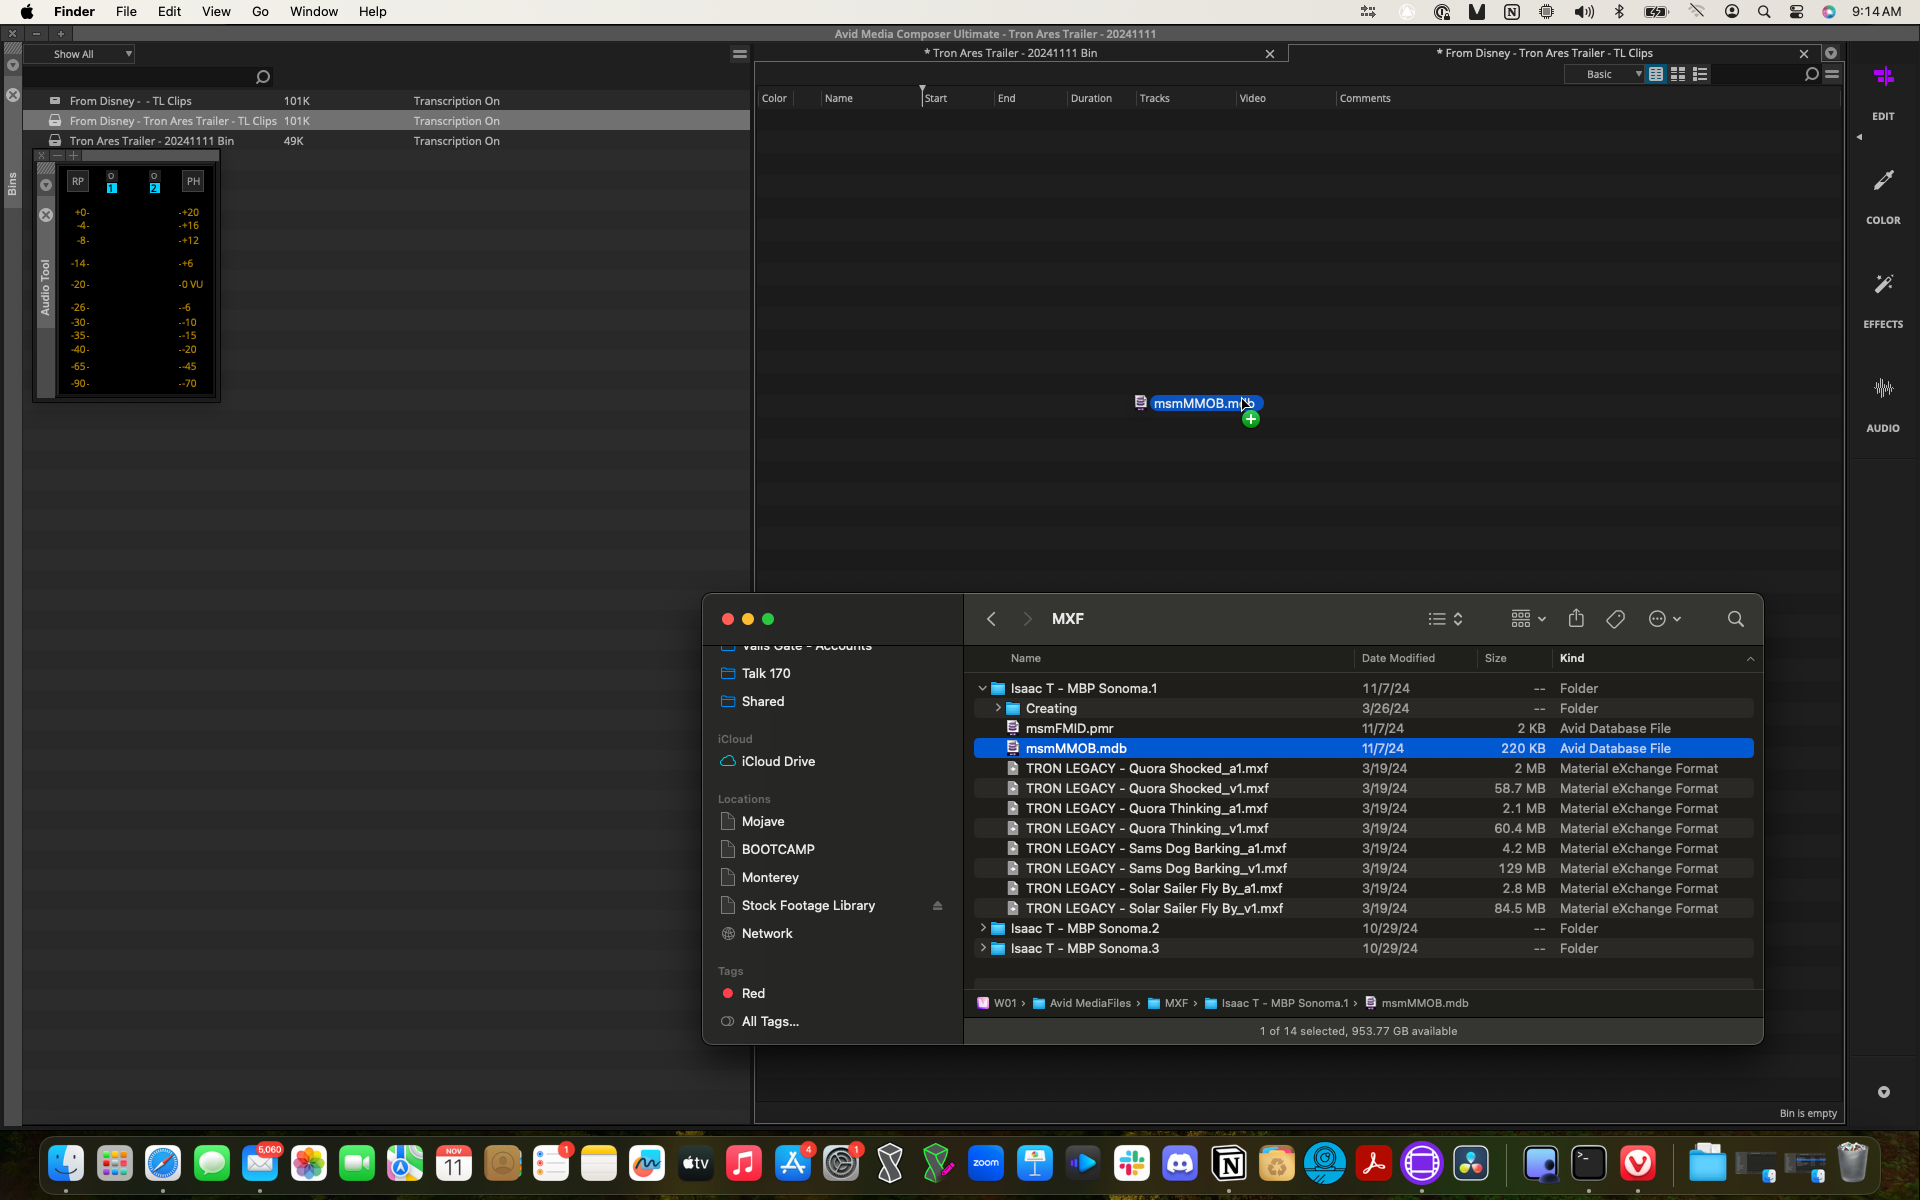
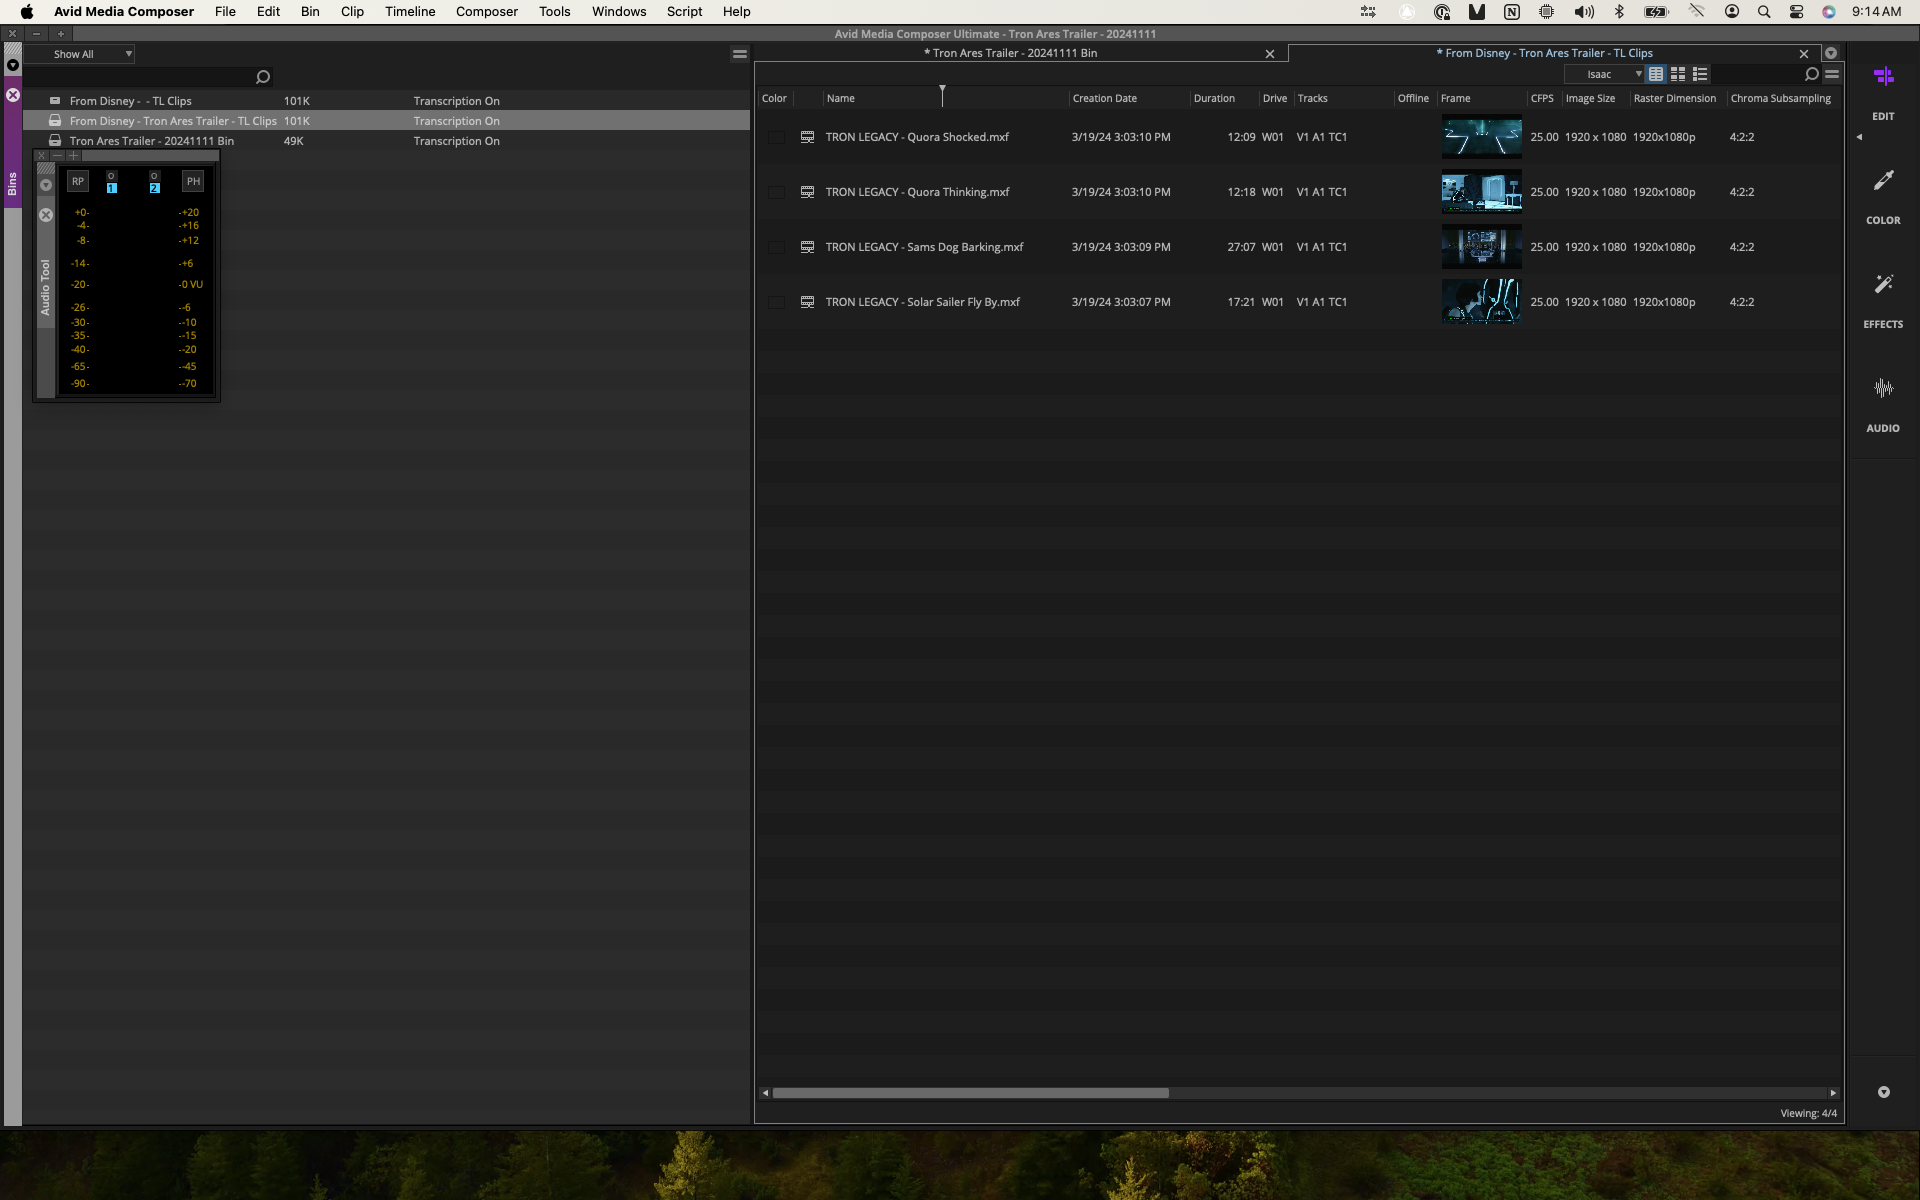
Astonishingly, James debuted RAV-bot’s Avid Bin Generator about two years ago. If you’re like me and you missed this, that’s understandable. Like many, you were probably deciding whether or not to move away from Media Composer 2018.12.x while navigating the endless menu of Media Composer versions to choose from at the time.
If you’re an Assistant Editor, you’ll definitely save some keyboard and mouse clicks using this. But as a DIT or Lab Technician, the Avid Bin Generator could be invaluable in your practice. Delivering dailies with Avid Log Exchange (ALEs) files is good. But shipping actual Bin files (AVBs) named according to a production’s specification? 🔥 (See the Dailies: Best Practices article in Netflix’s Partner Help Center and do a Find for bin.)
When you’re on set, every second counts. Keep looking for those fractions of a second to shave.
Victory (and dinner with family or friends) awaits.

ALE EDITOR BY DALBYTECH
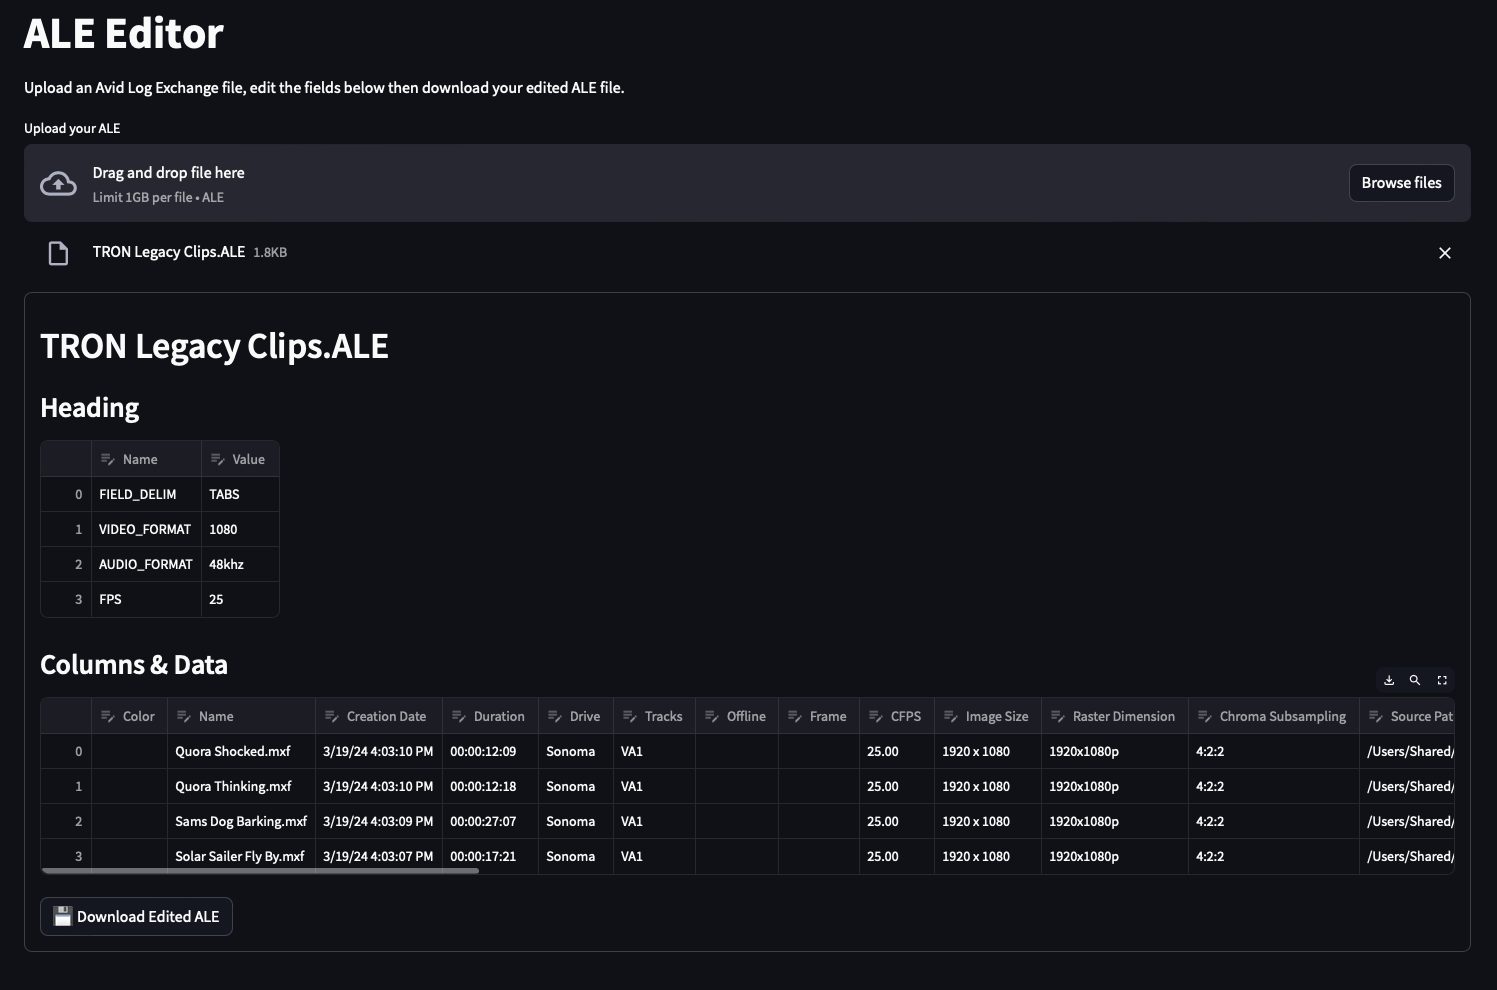
All my recent conversations on using Avid Log Exchange (ALE) files revealed another possibility – the browser-based ALE Editor by DalbyTech:
https://ravbot.dalby.tech/ALE%20Editor
ALE Editor is part of RAV-bot, the Remote Audio Video toolkit by James Dalby. Upload your ALE, edit it with a simple spreadsheet-like experience right in your web browser, then download it!
Looking at the whole RAV-bot suite, I’m seeing another great option for DITs, Lab Technicians, Assistant Editors, or any related workflow architects and engineers in production or post.
(🤔💭I wonder if using RAV-bot’s Generate Named Avid Bins web app along with the ability to generate the MDB in Media Composer | First could help DITs add even more value to delivering dailies?)
Writing cover letters all morning; need a refresher.
I thought the PostLab 2.0 update from November 1 would be the last one before the FCP Creative Summit, but hold up…
PostLab 24.0.15 with Dropbox support? 👏🏽👏🏽👏🏽
There are so few who have the ability to take something complex, present it to you with clarity and simplicity, and not make you feel bad for failing to grasp it years ago.
Simo Virokannas is one of them.
https://simo.virokannas.fi/2024/06/just-some-pointers/
